 |
| Easy fold-and-sew method featured on my video. |
Do you have a hand-me-down
sewing machine in the closet? Would you love to make throw pillows to dress up
your room, but don’t know how? Throw pillows are the perfect first project if
you are just learning to sew, but it’s hard to get up the nerve to start a
project like that if you don’t have someone at home to show you what to do. I made a how-to-video and a super-easy method for making pillows that will have your whipping them up in no time. See my illustrated tutorial and animated video below.
 |
| Instantly transform a boring room with pillows. |
We won’t bother with trying to sew a zipper in—that’s too much trouble. Instead, we’ll use a simple and tidy-looking velcro closure. My patterns also offer the option of skipping the velcro closure and just hand-sew the pillow closed if you prefer. I like velcro option though, because it’s faster and you’ll be able to remove the pillow cover and machine wash and dry it as I’ve already accounted for shrinkage.
 |
| Pillow patterns are printed directly on fabric with helpful guides and markings. |
To make things really super-easy, I’ve made pillow patterns that are printed directly on fabric with plenty of guides and markings to help you know what to do so you can just cut them out and sew them up. ORDER HERE (remember to choose linen-cotton fabric). (I'm in the process of uploading more of my designs so check back. There will be more soon!) These are great for expert sewers too—they sew together in a snap. Do you have a great piece of fabric that you would like to use instead? I’ve provided .pdf patterns below that you can use. (Coming Soon!)
For each pillow type, I’ve optimized the number of pillows you can squeeze out of a yard of fabric:
 |
| Three 16” in one yard—perfect for a bed arrangement or both sides of a sofa plus one side chair. |
 |
| Two 16” and one 12”x16” lumbar pillow in one yard.—Great for a sofa and chair arrangement because the lumbar pillow is particularly nice for chairs. |
 |
| Three 12”x16” lumbar pillows in one yard—I just love this size of lumbar pillows. Not only are they great for an extra-pretty back support on most side chairs, they make the perfect headrest while lounging around on the sofa. They're my first choice for a living room sofa and chair arrangement, but they're also great scattered here and there around the house to brighten things up. |
 |
An assortment of 18”, 16”, and 14” pillows in one yard—Nice for a bed arrangement, or order a set for each side of the couch. You can choose two different sets and mix them up together for an extra-colorful effect.
|
 |
| Dining and living room chair cushions in two yards. 24” seat cushion, 20” back cushion, and a 12”x16” lumbar cushion. Fits most dining room and living room wicker chairs. No need to use the specially-shaped seat cushions--These squares work great. Don’t bother re-upholstering your old living room chair. Replace it with a stylish wicker chair and change (and wash!) the pillow covers as you like. I like to use Ikea pillow inserts for chairs because they are nice and flat (and very inexpensive). Ikea's 26" pillow runs small, so it's perfect for the 24" pillow. (Shown here: Ikea Byholma and Pier 1 Temani chairs) |
 |
| Complete place setting with 24” and 20” chair cushions plus a reversible placemat and 20” dinner napkin in two yards. Mix and match for variety. |
Whole table of chair cushions for four chairs—four 24” seat cushions and four 20” back cushions in 6 yards (or two chairs in 3 yards).
You can order the pillow designs at Spoonflower here: I chose to use Spoonflower’s linen-cotton fabric. It is really lovely fabric. The colors print beautifully on it and the natural linen texture only improves with washing. Again, make sure to order the
linen-cotton fabric. Other fabric types aren't as wide, so part of the design will be cut off. I've also accounted for shrinkage with this particular fabric so you can machine wash and dry your pillow covers. (see the guinea pig pillows photo below to see how they wash up).
Soon, I hope that you’ll be able to
find designs by other designers using my patterns there as well.
You can watch my how-to video below. I’ve included illustrated instructions as well.
If you are a beginner, I recommend that you watch the video first and then refer
to the illustrated instructions to remind you what to do. If you are a more
confident sewer, you can just go straight to the illustrated instructions.
See illustrated sewing instructions below.
If this works out well for me, I plan to make other patterns as well--bedspreads, garments, and other fun projects. You can help me decide what to do next by commenting on this post. I have a ton of ideas I'd love to work on.
Are you a Spoonflower designer? You can use my pillow pattern file for free and sell your pillow designs on Spoonflower or Etsy as you like. Click here for more information and to download my pattern files.
Are you a seamstress who can sew these pillows for others? I don't have a separate page for you yet, but you can leave your price for sewing and shipping as a comment to this post for now.
Pillow Sewing Instructions - Velcro Closure
 |
| Step 1 - Cut out my Spoonflower pattern that is pre-printed on the fabric. Or use the pattern I provided if you are using your own fabric. |
 |
| Step 2 - Zig Zag along the short edges of the rectangle to prevent fraying. |
 |
| Step 3 - Find the velcro guides along the two short sides and cut your velcro to size. |
 |
| Step 4 - Pin the velcro in place and sew on to the fabric. |
 |
| Step 5 - Fold in half matching numbers on corners. |
 |
| Step 6 - Find the seam marks at the ends. |
 |
| Step 7 - Transfer seam marks to the back side of the fabric. |
 |
Step 8 - Make seams at both ends of the velcro to make the velcro opening. Use the seam marks
as guides and double-back to reinforce the seam at openings. The seam allowance should be about
1 1/4 inch. |
 |
| Step 9 - Open the seam. |
 |
| Step 10 - Press the seam open, being careful not to melt the velcro. |
 |
Step 11 - Sew both side seams with 5/8" seam allowance. Double back at the ends
to reinforce the seams. |
 |
| Step 12 - Clip each corner, 1/8" from the seam. |
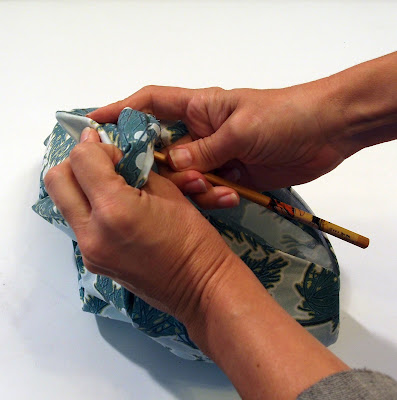 |
Step 13 - Turn inside out using a chopstick to poke out the corners as needed (be
careful not to poke through the corners). Press and insert pillow form. |
 |
| Done! |
Pillow Sewing Instructions - Hand Sewn Closure
 |
Step 1 - If you choose not to use velcro, trim off at the ends as shown on the
pattern when you cut it out. |
Follow steps 2 to 6 above, skipping steps 3 and 4.
 |
| Step 7 - you'll need to mark only the end marks. |
Skip steps 8 to 10 above.
 |
Step 11 - make a 5/8" seam around the pillow edges stopping at the end marks.
Double-back to reinforce the seam at the ends, especially at the opening. |
Follow steps 12 and 13 above.
 |
| Step 14 - Hand sew the opening closed. |
I'd like to make a video to show beginners how to use a sewing machine one day, but for now you can try searching YouTube for one. If you’ve found a good one you can recommend, please comment on this post and let me know.






 Posts

